Table of Contents
The calendar module allows you to manage appointments. Those can be business-related or private. It can display birthdays from the contacts and show people's vacations, and much more. This chapter explains the calendar module, including it's configuration. Thanks to Patrick Malaison for providing the initial version of this chapter!
![[Note]](images/admonitions/note.png) | Note |
|---|---|
The calendar module is still the worst part of more.groupware at this time. You might encounter a lot of bugs - sorry for this! But we suffer from a lack of time and manpower. If you would like to see this fixed, you can help by donating your skills, your time for testing, or your money. | |
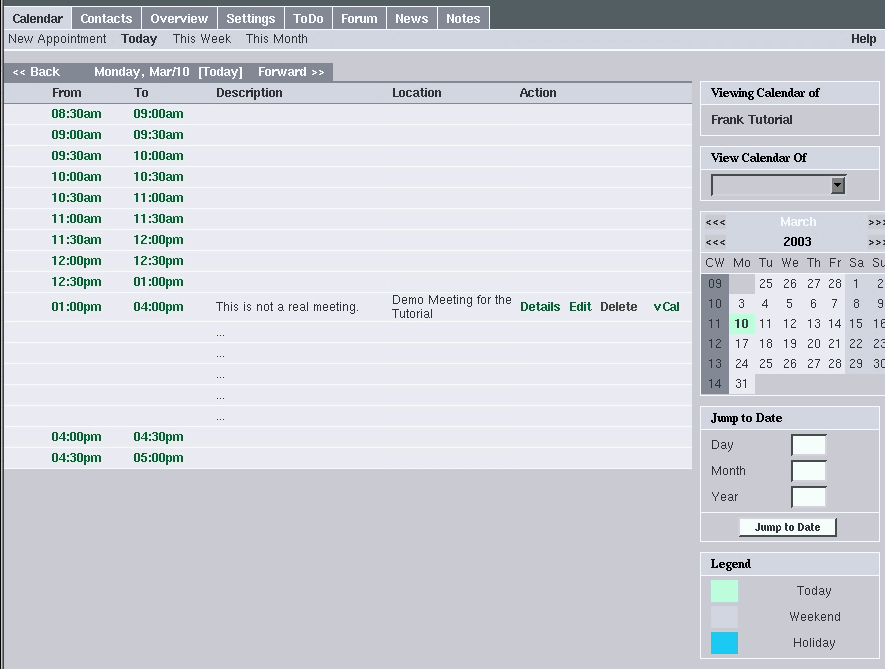
Once you click on the Calendar tab you will be presented with the default view for your calendar. By default this screen will be the Daily view. This screen includes many items, some of which can be customized. The customization will be explained in the Settings Module.
The Sub menu located immediately below the menu bar allow you to create a New Appointment and to browse between the different views, we will get to this in just a moment. On the right side of the screen are tools to help you use the calendar:
The first box indicated who's calendar you are monitoring, usually your own.
The second box allow you to select any other user that you would like to inquire about their schedule.
Next is a Monthly Calendar. You can switch month back clicking the arrows located on each side of the month. The next line indicate the year, you can change the year on the same fashion you do the months. To select a specific day of the month, just click on the date in the calendar.
The next box allows you to quickly jump to a specific date by entering it in the appropriate boxes and clicking the "Jump to Date" button.
Lastly, you are presented with the color legend for the calendar.
Let's have a look at the different views that you can access in this module. This is the main part of the window.
In this view, you see an overview of the day that is displayed on the first line after the 2 menu lines. You can change the day shown by clicking the Back or Forward link on each side of the date. The default view will show time from 8:00AM to 5:00PM in 30 minutes increments by default, please refer to the Settings Module Documentation to change those values.
When you have an appointment, it will show up as shown in the picture above. Here is an explanation based on this example.
Table 10.1.
| From To: | The start and end time will be shown on the same line. The time slots occupied by that meeting will not show up. Here the meeting starts at 2:00 PM and ends at 3:30 PM |
| Description: | Self-explanatory, the description of the meeting or event. |
| Location: | Where the meeting is to be held. |
| Action: | There you'll have links to action that you can perform on that item. These actions include: Details, Edit, Delete and vCal. They will be explained now. |
Clicking on the details button will show you the details pertaining to this event in your calendar. Let's have a look at the details for our example:
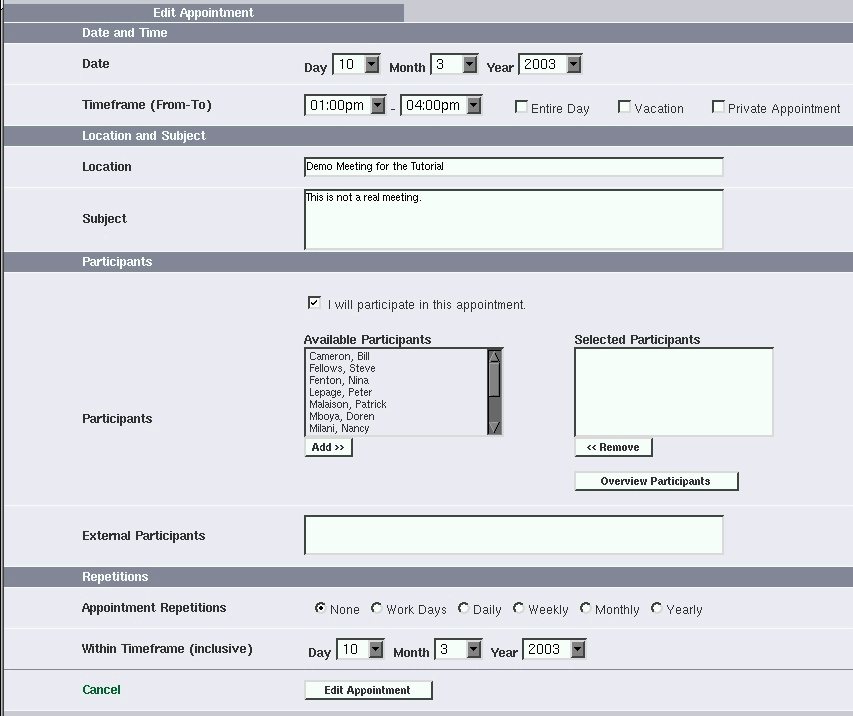
This is the screen that you will see if you click the Edit button on the Today view for a specific appointment. As you will see later, it is very similar to the New Appointment screen both in look and functionality. Please refer the New Appointment section for more details on how to use this screen. The only difference is in the button to submit your changes, it is called Edit Appointment, you click on it when you are finished entering your modification and ready to submit the new appointment. You can click on Cancel at any time to cancel your changes and return to the previous page.
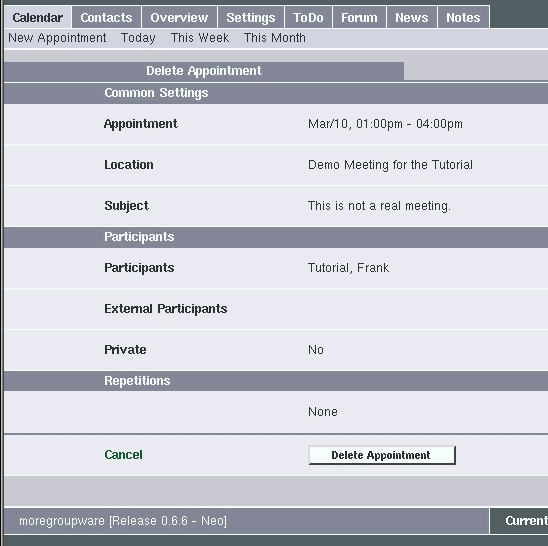
If you wish to remove an entry from you calendar, you click on the Delete link for the item you want to cancel. You will be presented with a screen very similar to the Details screen, except for the Delete Appointment button at the bottom that you click to submit the cancel request.
If it is an appointment that you created yourself, it will be automatically deleted once you click on the Delete Appointment button. If it is an appointment that was created by someone else, you'll will have to decide if you want to delete it only for yourself or for everybody that is part of this meeting. Once again, be careful with the Delete process has there is no additional confirmation message.
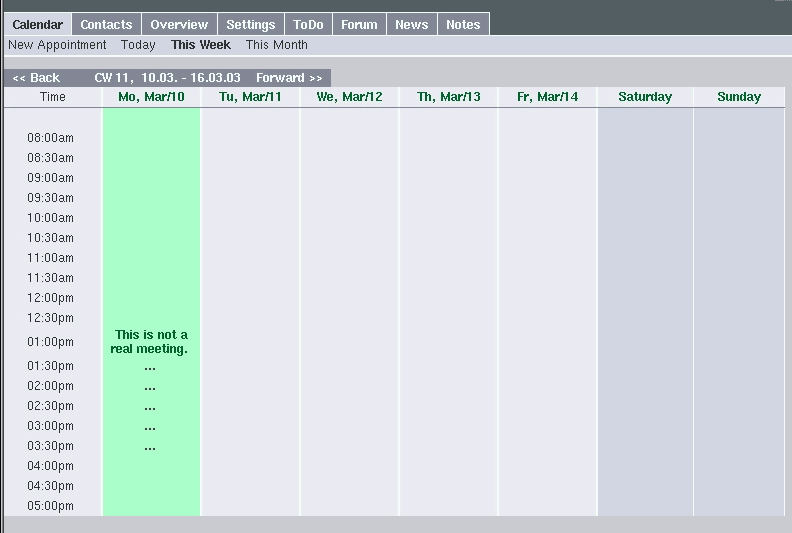
This is the screen that will show you a weekly view of your agenda. You can move to different week by clicking the Back and Forward link on each side of the dates at the top of the screen. If you would like to go to a specific day, just click on the corresponding date.
You can view the details of any meetings by clicking on the item in question. You will then be presented with the Details view as described in the Today view section. You can click the back button at the bottom of the meeting detail window or use any of the navigation links at the top to continue.
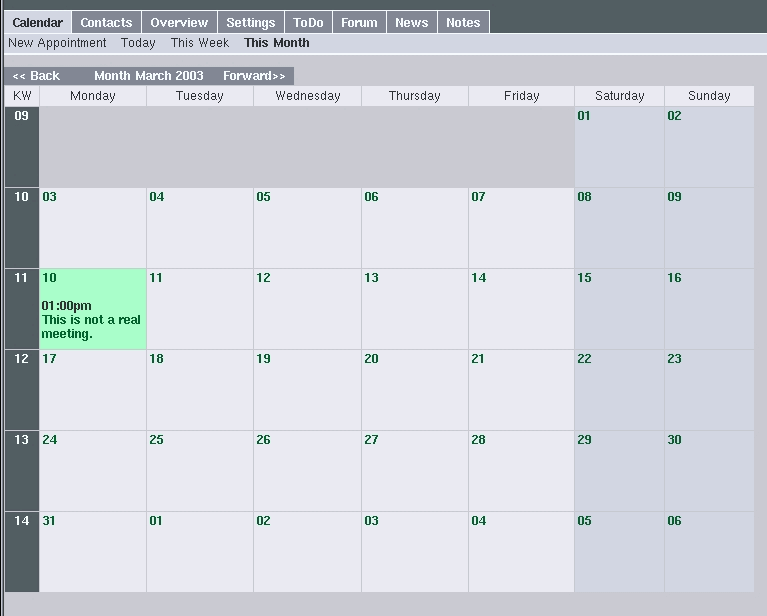
This view, has its name implies shows a monthly view of your agenda. The left end column shows the week number out of 52. As with the weekly view, to see the detail of any specific item, just click on that item. You can also move from month to month using the Back and Forward link surrounding the month being displayed. You can access a specific week by clicking on that weeks number on the left or a specific day by clicking on the date you wish to access in the same fashion.
![[Note]](images/admonitions/note.png) | Note |
|---|---|
You can only Delete and Edit appointments from the daily view. If you want to do either of these action while in another view, you will need to first go to the schedule for that specific day as explained above. | |
